Airbrush skin like a pro. In this Photoshop retouching tutorial, you'll learn how to retouch skin like the professionals. Find out how to make skin look healthy without looking plastic or blurred.
Sample PSD (Photoshop Document)
Airbrushing Skin Photoshop Tutorial
Step 1
Open the photo into Photoshop. For this tutorial, try to use a high resolution image where you can see the skin texture.

Step 2
Create a duplicate layer and put it into a group. To do this, press Ctrl+J to duplicate the layer then Ctrl+G to place the new layer into a group. Name the group "Airbrush" and the layer "Blur". To retouch the skin, there will be two layers in the Airbrush group. The first layer we've created (the Blur layer) will be used to blur the skin. After that, we'll add another layer to restore the natural skin texture.

Step 3
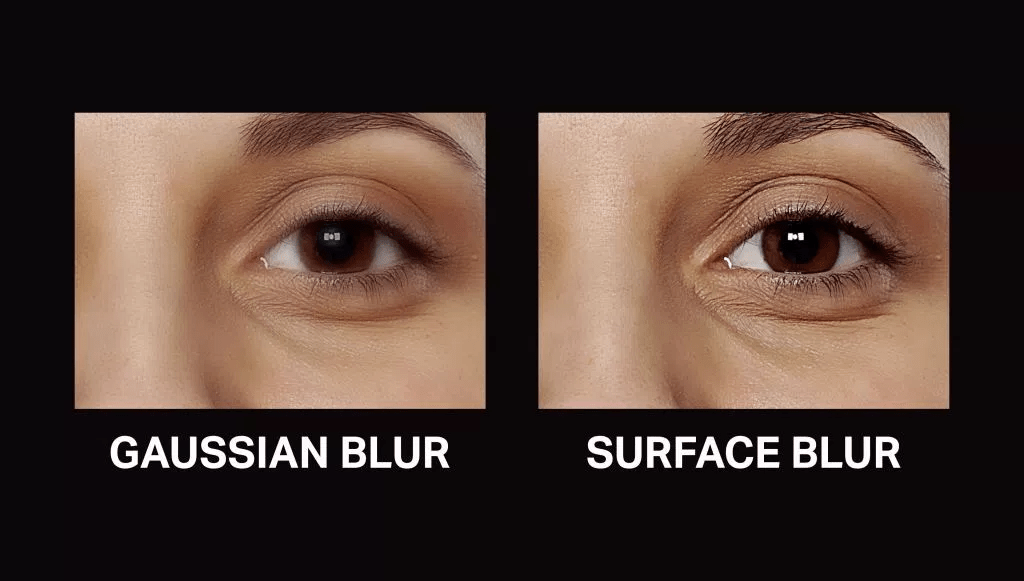
Have the Blur layer selected. To blur this layer, use the Surface Blur filter. This filter blurs like the Gaussian Blur filter except it can retain edge detail. We'll need to blur the layer so that the skin is smoothed and somewhat blurry without having the edges

Here's what my image looks looks like after the Surface Blur filter. Your image should look similar with details such as the eye intact. If the eye becomes blurry, your settings are too strong. Undo and redo the Surface Blur filter with a lower setting.

Step 4
Create a new layer and move it above the Blur layer. Name this layer "Texture" and change the blend mode to Hard Light. This layer, as the name states, will be used to add a slight texture to the skin and also adjust the skin tonality.

The texture created in this layer will contribute to the final results very minimally - the difference can only be easily seen zoomed in on high resolution images and varies from image to image. Even though the result is very minimal, it ensures that no area of the skin looks too smooth or plastic.
Below is an example of this. On the left, the image looks like a solid color, also known as plastic skin. The image on the right has a slight noise pattern to make the skin look more realistic.

Step 5
Make sure that you have the "Texture" layer selected. With that layer selected, press Shift+F5 or choose Edit > Fill. In the Fill tool, set the settings according to the image below. This will fill your layer with a 50% gray color.

Step 6
Open the Add Noise filter from the Filter > Noise menu. Enter in the settings shown in the image below. This will add some noise to the image that will prevent skin from looking plastic. It may look a little too sharp, but in the next step, we'll fix this with a Gaussian Blur filter.

Step 7
Choose Filter > Blur > Gaussian Blur. Blur the layer by 1 pixel.

Step 8
Now we'll temporarily tint the color of this layer. First, select the Eye Dropper tool from the toolbar. Sample an area on the skin that appears to be the average skin color. You don't have to be very precise because we will tune the color later in the tutorial. In the Color palette, click on the flyout menu below the close window button and select HSB sliders. We'll need to see the HSB values for the next step.

Step 9
Open the Hue/Saturation tool by pressing Ctrl+U or choosing Image > Adjustments > Hue/Saturation. Check the Colorize option and adjust the hue, saturation, and lightness values to match the HSB values from the color we sampled in the previous step. For the brightness, set this to

Step 10
Select the Airbrush group in the Layers palette and add go to Layer > Layer Mask > Hide All. This will create a layer mask filled with the color black that will hide the group. With this layer mask, we'll paint the areas were we want the skin to appear. Otherwise, this skin airbrushing effect will appear on the entire image.

Step 11
First, press D on your keyboard to set the foreground and background colors to the default black and white. Select the Brush tool and apply the settings below.

Zoom in to 100% and paint over the skin. The parts that you paint will appear smoother with a different skin tone. Don't worry if the skin tone doesn't look correct. This is because we didn't pick the correct color when we used the Hue/Saturation to tint the "Texture" layer. It's too difficult to do that without a preview, so we'll fix that later.
When painting, you'll need to change the brush size and hardness frequently. It would be tedious to always access the brush option menu to do this so take this as an opportunity to use hot keys. Use the following hot keys to help you with modifying the brush size and hardness:
- Decrease brush size: [
- Increase brush size: ]
- Decrease brush softness by 25%: Shift + [
- Increase brush softness by 25%: Shift + ]

When you're done, your layer mask should have the skin areas in white and the skin should look smooth.

Step 12
Now we're going to fix back the color and tone of the skin as we mentioned earlier in the tutorial. Select the "Texture" layer and press Ctrl+U to access the Hue/Saturation tool. Alter the settings to get a natural looking skin tone.
- The Hue setting is usually correct. I increased it by 10 to add more yellow to it to make the appearance of the red areas less visible.
- The Saturation setting usually needs to be reduced greatly. Adjust this until the skin tone looks natural but not too pale.
- The Lightness setting requires slight modification. A slight change in the lightness will create big difference in how the skin blends in with the image. As you adjust the setting, you will see how sensitive this setting is. Even though it requires high precision, it is easy to tell when it is the correct setting. If it is off, it will look really off. If it is at the correct setting, it will look a lot more natural.

Step 13
Finally, we're going to restore the skin details. Choose Image > Apply Image. Use the settings below.

The reason why we're applying data from the Red channel is because it contains the least skin imperfections. The image below shows the difference in the channels. The red channel hides many of the skin imperfections that are visible in the green and blue channel.

Final Results
Here's the final results after applying this airbrushing technique. In the image below, you can see how smooth the skin looks. Because the image below has been downsized to fit into this tutorial, it may look slightly plastic. However, when zoomed in, the texture is clearly visible.

This is a crop of an area zoomed in 100%. The tiny skin bumps are still visible. Even near the bottom right of the image, it still looks natural because of the "Texture" layer that we added. Without that layer, that area would appear as a solid color with no noise.

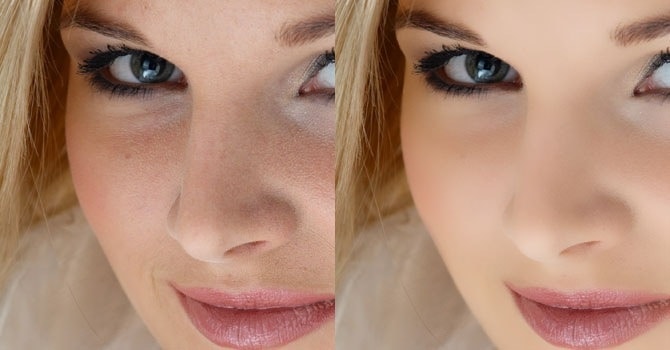
And as usual, here are the before and after images.


Update: Here's a video on retouching skin in Photoshop. It's a completely different tutorial than this one but I highly recommend you watch it.
Skin Retouching Photoshop Actions
Update 2: I highly recommend you try these skin retouching actions - they're the best actions you can get. To use, simply play the action then paint over the skin. You can airbrush skin, mattify skin, restore blown-highlights, and more. Highly recommended. The Pro version includes additional actions.
Update 3: If you're looking for something basic, download these Frequency Separation Photoshop actions. They're made a similar frequency separation technique shown in this tutorial and can autoretouch your photo using Photoshop's face detection technology. The Pro version works with 16 and 32-bit photos and lets you apply both modern and traditional frequency separation. Don't know what modern/traditional frequency separation is? Read below.
What is Modern vs Traditional Frequency Separation?
One of the techniques that you learned in this tutorial is Modern Frequency Separation. This is done using Photoshop's Surface Blur filter which gives more natural results. With Traditional Frequency Separation, the Gaussian Blur filter is used instead of Surface Blur. This gives a softer and more diffused look. It's also less natural-looking so I recommend using it with caution especially on portraits with wrinkly skin.
See this image from Denny's Tips as an example:
awesome tutorial!!! Thanks for sharing.
Great freebies, thanks for sharing!
Best Photo Editing Tutorial.
Great!!!!!
Amazing step by step photoshop skin retouching tutorial. Thanks for sharing. Very helpful.
nice info thanks for the help
What a tricks and tips! Great and innovative. I like it. Thanks for sharing with us.
Great tutorial - learned a lot!
Hello, I'm trying to follow again with this tutorial, but about half the images do not display, making it impossible to see what's going on in steps 11 - 13. Can something to be done to bring the images back? Thanks.
Great tutorial as always
Getting a look at the sample PSD files are a great thing here! You can learn so much more seeing the actual file.
great tutorial, I learned a new thing from the post. Thanks for sharing.
What tutorials for new commer. I just started photography. Your blog was really so helpful to me. Many many thanks for sharing with us.
Hi, this is a very good tutorial. You know it's very important not to exaggerate while editing. You dont want your portrait to look like it's been retouched. Your radiant skin and bright eye color should look as natural as possible. Though i have lately made some progress, every new picture editing is a new challenge for me, cause they are never the same. Some pics are poorly lit, some need skin retouching, etc.
nice way to represent the 15 steps of skin air brush techniques and nice video also
very nice article it is very helpful. great collection and a lot of good inspiration for getting better final results 🙂 Helped me getting even more beautiful shots. Thanks for sharing!
Excellent and straightforward tutorial, thank you
Excellent, It is very helpful tutorial of image retouching, thank you very much for sharing this.
I'm getting stuck at step 5. Not sure what I am doing wrong but the whole layer is gray. I'm following the steps described but I cant see where I'm going wrong.
It doesn't show anything past the the airbrush mask. Is there further directions after that?
Just wow.I have lost my words.Excellent image retouching, thank you very much for sharing your works.
Awesome Photoshop Tutorial . It's really very easy presentation. I'm loving it. Thank you very much.
I hope who will see this tutorial he will be able to learn a lot. Skin is much smoother than before.
It is very helpful tutorial, I believe who ever tried this tut he/she must get idea how easy and healthy it is. Moreover if you want any free consultancy on photography or need website development you may contact to webperts. They are team of professionals.
Got to the last step and the paint brush overlay made the baby I was editing look like he had vitiligo. Not sure where I went wrong. Do I apply layer in the texture box? I'm confused.
I'm really confused. I got to the last step and but I can't use the brush. How do I finish it and paint the areas I need? Please and thank you.
The texture layer has to be set on "Hard Light". that makes 50% grey disappear 🙂
Tried a couple of times over the years, and never fails to confuse me with this badly written steps whereby many many pointers had been omitted. Sadly
there is confusion in the 4th step. when we make texture layer and make it 50% gray the whole layer becomes gray and when we add noise its get added to that gray layer ... am i doing it wrong ?? and what we will do after step 10 ???
every time I am doing this, my screen and layer just stay gray!! what am I doing wrong? I don't see the picture when I open the add noise filter, like yours, everything is gray?
WHAT AIRBRUSH GROUP? THE LAST STEP THREW ME OFF. THERE WAS NO STEP ABOUT CREATING AN AIRBRUSH ANYTHING.
It's literally the 2nd step.
Step 4 needs to clarify more. Created new layer but its not transparent as shown in image...........
Best ever. Just great
NICE!!!! This is the best retouching process I've seen so far. THANKS!!!
I do appreciate the tutorial. Very informative. Regards, Peter Oluoch
What happens after 7 with the gray colour?? mine is completely filled with gray and there is no step in how it is removed/shifted to review the skin colour for the eye dropper. Please please help!!
Make sure that the 50% gray layer has the blending mode "Hard Light"
Well done ! fantastic work, I think Hue/Saturation is most important part in this editing. Thanks for sharing with us.
super!
Wow. Finally!!!! The first tutorial that has actually helped me! Thank you soooooo much:)
wow, this is one of the worst retouching techniques i've seen in a while.....!
Simply awesome. It is really helpful for people who are dedicated in photo retouching & also for graphic designer.